

5.3 Distance Measurements
Dimensions of 9 different crystal types are calculated to leave a
200 µm gap between adjacent modules to accommodate the module
wrapping. However, there is no additional "dead" material foreseen to support
individual CsI-crystals; they are built up in a self-supporting geometry. This
design requires a very precise fabrication of the crystals, which is
complicated by the irregular shapes of the 9 different modules. Tolerances for
linear tl and angular (tn,
to) deviations from the theoretical shapes are calculated to
achieve a precision of
tl = ±0.3 mm.
(5.4)
In order to check the specified tolerances, each crystal is examined by a
computer-controlled measuring machine, capable of recording the coordinates of
any point inside a volume of 3 m3 with a precision of 7 µm. The
machine is programmed to automatically scan the surface of a CsI-crystal. For
each side 6 points are recorded and a plane is fitted through these points with
a least-square method. The planes are represented in the form
 ,
,
 is the unit vector perpendicular to the surface of the plane and d is the
distance from the origin of the coordinate system. The angle d
between two planes with normal vectors
 is thus
 .
.
 Figure
5.4:
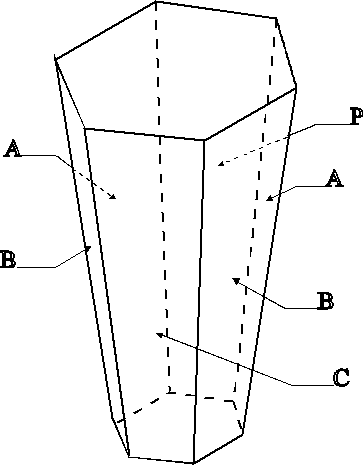
Definition of the sides of the module type HEXA. Angular tolerances between
neighboring sides (P/A,A/B,B/C,...) are 0.24°. For angles between opposite
sides (opening angles P/C, A/B and B/A) the tolerance is 0.08° to achieve
the required tolerance of ±0.3 mm.
For angles between planes two categories are distinguished:
* Angular deviations between neighboring sides (Fig. 5.4). The resulting
tolerance from (5.4) for the deviations is tn=0.24°.
* Angular deviations between opposite sides (Fig. 5.4), which are the opening
angles of the module and thus the most critical quantities. The tolerance for
the deviations is to=0.08°.
In addition, the vertices of the module are calculated and compared to the
theoretical values. The vertices of the module allow the calculation of linear
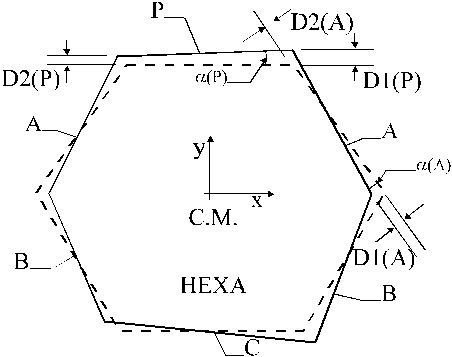
deviations for the front face and the back face as shown in Fig 5.5. The
tolerance for the deviations is 0.3 mm as defined in (5.4). For each module the
deviations are calculated and recorded in a data sheet. For a HEXA crystal, the
data sheet is displayed in table 5.2.
 Figure
5.5:
Comparison of the shape obtained from distance measurements (solid lines),
exaggerated for better visibility, to ideal shape (dashed lines). For each
side, the deviations D1 and D2 are calculated, which are positive (negative) if
the measured vertex lies outside (inside) the dashed shape. The tolerance for
the deviations D1, D2 is ±0.3mm. In addition, the angle a is
calculated for each side.
A summary data base of the 4 categories of deviations of each crystal is
produced to overview the results from all the modules. For each category of
deviation (e.g. angles between neighboring sides,), the mean value m,
the number of values n exceeding the specified tolerance and the maximum
value x is calculated. In order to provide an entry to the pibeta
crystal data base, which classifies the geometrical precision a crystal, the
quantity DIM is defined as
 ,
(
5.5)
where xo is the maximum value and
to=0.08° the maximum allowed deviation of angles between
opposite sides. The values for m, n and x of the different
categories and the value DIM of measurements on 25 crystals delivered by
BICRON Corporation is shown in Table 5.3 .
Angles
btw. Neighboring sides [deg]
|
|
|
|
|
Angles
btw. opposite sides [deg]
|
|
|
|
side
|
th
|
exp
|
diff
|
|
side
|
th
|
exp
|
diff
|
B\A
|
66.17
|
66.13
|
-0.04
|
|
A\B
|
14.28
|
14.32
|
0.04
|
A\P
|
54.17
|
54.06
|
-0.11
|
|
P\C
|
12.42
|
12.46
|
0.04
|
P\A
|
54.17
|
54.15
|
-0.02
|
|
A\B
|
14.28
|
14.32
|
0.04
|
A\B
|
66.17
|
66.19
|
0.02
|
|
|
|
|
|
B\C
|
58.34
|
58.38
|
0.04
|
|
|
|
|
|
C\B
|
58.34
|
58.45
|
0.11
|
|
|
|
|
|
|
|
|
|
|
|
|
|
|
Linear
deviations back side
|
|
|
|
|
Linear
deviations front side
|
|
|
|
side
|
D1
[mm]
|
D2
[mm]
|
a
[deg]
|
|
side
|
D1
[mm]
|
D2
[mm]
|
a
[deg]
|
A
|
-0.11
|
-0.22
|
0.11
|
|
A
|
-0.09
|
-0.13
|
0.08
|
P
|
-0.19
|
-0.17
|
0.02
|
|
P
|
-0.23
|
-0.20
|
0.05
|
A
|
-0.09
|
-0.04
|
0.05
|
|
A
|
0.02
|
0.05
|
0.07
|
B
|
-0.12
|
-0.09
|
0.03
|
|
B
|
-0.10
|
-0.10
|
0.00
|
C
|
-0.11
|
-0.11
|
0.00
|
|
C
|
-0.13
|
-0.16
|
0.04
|
B
|
-0.07
|
-0.19
|
0.12
|
|
B
|
-0.01
|
-0.09
|
0.13
|
Table
5.2
Data sheet from distance measurements of a HEXA type CsI-crystal showing the
four categories of deviations.
|
Front
sides
|
Back
sides
|
Neighb.
sides
|
Opposite
sides
|
Serial
|
m
|
n
|
x
|
m
|
n
|
x
|
m
|
n
|
x
|
m
|
n
|
x
|
DIM
|
S001
|
0.21
|
0.00
|
-0.25
|
0.22
|
0.00
|
-0.28
|
0.07
|
0.00
|
-0.11
|
0.13
|
2.00
|
0.13
|
0.62
|
S002
|
0.17
|
0.00
|
-0.23
|
0.17
|
0.00
|
-0.20
|
0.05
|
0.00
|
0.06
|
0.05
|
0.00
|
0.06
|
0.00
|
S011
|
0.13
|
0.00
|
-0.23
|
0.14
|
0.00
|
-0.22
|
0.07
|
0.00
|
-0.12
|
0.04
|
0.00
|
0.04
|
0.00
|
S012
|
0.05
|
0.00
|
0.09
|
0.05
|
0.00
|
-0.10
|
0.08
|
0.00
|
-0.14
|
0.02
|
0.00
|
0.03
|
0.00
|
S013
|
0.23
|
2.00
|
-0.39
|
0.07
|
0.00
|
-0.10
|
0.07
|
0.00
|
0.11
|
0.12
|
2.00
|
0.15
|
0.97
|
S014
|
0.13
|
0.00
|
-0.21
|
0.06
|
0.00
|
-0.12
|
0.03
|
0.00
|
0.04
|
0.05
|
0.00
|
0.08
|
0.00
|
S061
|
0.10
|
0.00
|
-0.14
|
0.11
|
0.00
|
-0.15
|
0.03
|
0.00
|
-0.04
|
0.01
|
0.00
|
0.01
|
0.00
|
S062
|
0.12
|
0.00
|
0.20
|
0.20
|
2.00
|
0.37
|
0.07
|
0.00
|
-0.11
|
0.08
|
1.00
|
0.12
|
0.55
|
S111
|
0.21
|
0.00
|
0.29
|
0.14
|
0.00
|
0.25
|
0.06
|
0.00
|
-0.12
|
0.04
|
0.00
|
0.04
|
0.00
|
S112
|
0.18
|
0.00
|
-0.26
|
0.12
|
0.00
|
0.23
|
0.10
|
0.00
|
0.18
|
0.12
|
2.00
|
0.15
|
0.87
|
S113
|
0.17
|
0.00
|
0.23
|
0.09
|
0.00
|
0.16
|
0.03
|
0.00
|
-0.04
|
0.05
|
0.00
|
0.08
|
0.00
|
S114
|
0.16
|
0.00
|
0.25
|
0.14
|
0.00
|
0.27
|
0.03
|
0.00
|
0.05
|
0.04
|
0.00
|
0.07
|
0.00
|
S115
|
0.18
|
0.00
|
0.27
|
0.11
|
0.00
|
0.20
|
0.03
|
0.00
|
-0.05
|
0.04
|
0.00
|
0.06
|
0.00
|
S116
|
0.25
|
2.00
|
0.38
|
0.14
|
0.00
|
0.23
|
0.05
|
0.00
|
-0.07
|
0.06
|
0.00
|
-0.08
|
0.00
|
S117
|
0.23
|
1.00
|
0.35
|
0.12
|
0.00
|
0.21
|
0.03
|
0.00
|
0.05
|
0.05
|
0.00
|
0.07
|
0.00
|
S118
|
0.55
|
5.00
|
0.87
|
0.13
|
0.00
|
-0.20
|
0.19
|
2.00
|
0.36
|
0.16
|
2.00
|
-0.20
|
0.00
|
S161
|
0.12
|
0.00
|
-0.23
|
0.09
|
0.00
|
-0.19
|
0.14
|
0.00
|
0.22
|
0.07
|
1.00
|
0.09
|
0.09
|
S162
|
0.09
|
0.00
|
-0.13
|
0.08
|
0.00
|
0.15
|
0.13
|
0.00
|
0.22
|
0.06
|
0.00
|
0.07
|
0.00
|
S163
|
0.09
|
0.00
|
0.17
|
0.11
|
0.00
|
0.24
|
0.22
|
2.00
|
0.34
|
0.05
|
1.00
|
0.09
|
0.10
|
S164
|
0.07
|
0.00
|
-0.12
|
0.06
|
0.00
|
-0.15
|
0.14
|
0.00
|
0.22
|
0.05
|
0.00
|
0.07
|
0.00
|
S165
|
0.05
|
0.00
|
0.10
|
0.08
|
0.00
|
0.18
|
0.14
|
0.00
|
0.22
|
0.05
|
0.00
|
0.06
|
0.00
|
S166
|
0.10
|
0.00
|
0.17
|
0.11
|
0.00
|
0.17
|
0.12
|
0.00
|
0.22
|
0.02
|
0.00
|
0.03
|
0.00
|
S201
|
0.20
|
0.00
|
-0.28
|
0.12
|
0.00
|
-0.20
|
0.20
|
2.00
|
-0.31
|
0.24
|
1.00
|
0.33
|
3.23
|
S202
|
0.07
|
0.00
|
-0.14
|
0.14
|
0.00
|
-0.21
|
0.16
|
0.00
|
-0.21
|
0.19
|
1.00
|
0.27
|
2.42
|
S221
|
0.08
|
0.00
|
0.16
|
0.18
|
0.00
|
-0.27
|
0.09
|
0.00
|
-0.13
|
0.08
|
1.00
|
0.09
|
0.18
|
Table
5.3
Compilation of Distance Measurements of the 25 crystals delivered by BICRON
Corporation. The quantities m, n, x and DIM are defined on page 41.


 ,
,
 is the unit vector perpendicular to the surface of the plane and d is the
distance from the origin of the coordinate system. The angle d
between two planes with normal vectors
 is thus
 .
.


 ,
,
 is the unit vector perpendicular to the surface of the plane and d is the
distance from the origin of the coordinate system. The angle d
between two planes with normal vectors
 is thus
 .
.


